Features:
- Genuine Remote for Ditec and Prastel Openers in Australia
- Easy Programming
- Enhanced Security with Rolling Code Technology
- RPA remote Self Learning Function
- Durable and Sleek Design
- Free Shipping Australia-Wide*
- 2 Years Manufacturers Warranty*
Includes:
- Genuine Ditec Remote by Prastel
- Keyring Attachment
- Coding Instructions
Compatibility:
Ditec/Entrematic Remotes:
Prastel Remotes:
- BFOR
- MPSTF2RE
- MPSTF4RE
- MPSTL-1E
- MPSTL-2E
- MPSTP2E blue
- MT2E
- MT4E
- SLIM 2E
- SLIM 4E
- TC2E
- TRQ2P
- TRQ4P
Remote to Remote Programming: Using a working Ditec Zen2 or Zen4 or GOL4 remote
You will need to be within close distance to the opener to program your new remote. This is not cloning the remote but activating the learn mode within the motor via the remote.
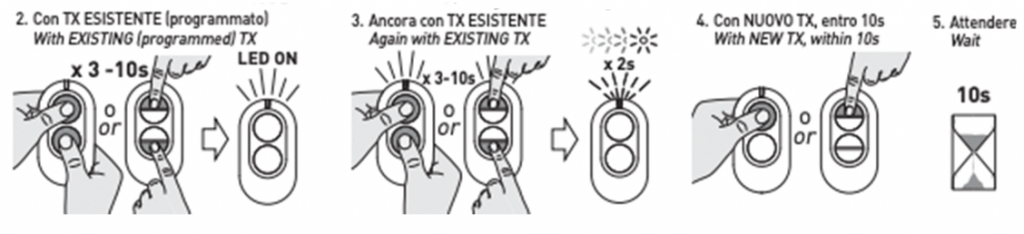
Ditec Zen Remote- On working remote, press and hold the top and bottom buttons until LED lights up (3-10secs)
- On the working remote, press and hold the top and bottom buttons until LED flashes twice
- Within 10 seconds on Press a Button on the NEW remote
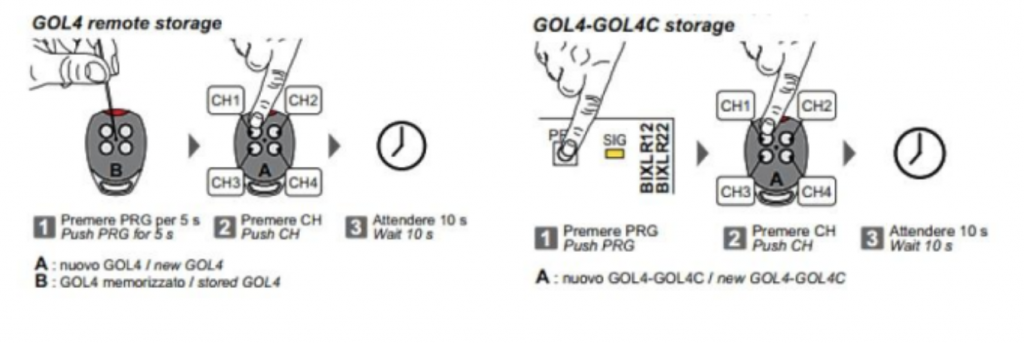
| GOL4 Remote- With a sharp pointed object (paperclip or pin) press the hidden button for 5 seconds on the working remote, red LED will illuminate.
- Press a Button on the NEW remote
- Wait 10 seconds for the system to reset before testing the remote
|
SLIM2E-DC and SLIM4E-DC- Press buttons 1 and 2 of the transmitter at the same time and release them, LED turns on for 2 seconds
- When LED turns off, press buttons 1 and 2 of the working remote at the same time and hold them until the LED starts flashing.
- When flashing ends press a button on the new remote.
- Wait 10 seconds for the system to reset before testing.
| |
Remote to Receiver Programming
Motors without LCD Screen on Control Board- On the Receiver, press the Programming button (PRG)
- When Receiver LED illuminates, release the button
- Press a button on your NEW Remote
- Receiver will blink and then remain lit for 10 seconds
| Motors without LCD Screen on Control Board- On your receiver you will have 4 buttons – UP/DOWN/OK/ESK. Above these buttons is a screen that will register the mode.
- RECEIVER – Press OK to activate the menu
- RECEIVER – Scroll up or down to select RO in menu
- RECEIVER – Press OK
- NEW REMOTE – Press a button on remote
- RECEIVER – Press OK
|
Only logged in customers who have purchased this product may leave a review.


Reviews
There are no reviews yet.